I open this post to lead further discussion and add several tutorial for solving problem about csr.
Here is several solution, references and drivers available for now. You may help others by sharing information here.
A. MANUALLY INSTALL CSR DRIVER IN WINDOWS 7.
B. LIST OF CSR DRIVER
C. INSTALL IN COMPATIBILITY MODE
A. MANUALLY INSTALL CSR DRIVER IN WINDOWS 7.
SOME NOTE:
1. Open device manager and under the OTHER DEVICES you will see yellow exclamation mark on the:
CSR_BTPORT_01
This refer to your bluetooth where (CSR BT = bluetooth PORT = port) simply mean CSR BLUETOOTH PORT.
2. The second device was "CSR BlueCore Nanosira" under "Universal Serial Bus controllers"and normally installed Cambridge Silicon Radio Limited. Whenever a devices doesn't have any yellow exclamation mark, windows will recognize the device installed and working properly.
SOLUTION:
Change the CSR Bluecore Nanosira to Generic Bluetooth Driver
1. Look for "CSR BlueCore Nanosira" under "Universal Serial Bus controllers"
2. Right click on it and select "Update Driver Software"
3. Then select "Browse my computer for driver software"
4. Select "Let me pick form a list of device drivers on my computer".
5. There will be several drivers there including CSR ("CSR BlueCore Nanosira").
6. select "Generic Bluetooth Radio" from the list and clicked OK.
7. Continue with on screen installation.
After that you will notice"Generic Bluetooth Radio" and "Microsoft Bluetooth Enumerator"listed under the "Bluetooth Radios" and the Bluetooth icon in the taskbar.
B. LIST OF CSR DRIVER
For WIndows 7 32-bit
Download
For Windows 7 64-bit
Download , and extract it.
Then install "64-bit" driver.
C. INSTALL IN COMPATIBILITY MODE
For this method, first you must download your Bluetooth vista driver from your manufacture.
After that:
1. Before installing - right click on the driver and select properties, the select compatibility, the select run this program in compatibility mode for" Select windows vista.
2. APPLY and OK
3. Then right click again on the driver and select run as admin
4. If your your driver pack come with bluetooth software such as bluesoliel, to run the software change the compatibility for windows vista too. and run as admin.
If you have problems or other thing to say, leave your comments in the section below.

Showing posts with label tutorial. Show all posts
Showing posts with label tutorial. Show all posts
Tuesday, October 25, 2011
Friday, October 14, 2011
Compa Presario V3000 Co-processor and Unknow device
I got an email asking for 2 devices missing in windows 7. So, what are the driver and how to fix it:
Image from the device manager:

For the coprocessor you need to install Nvidia Chipset driver:
Nvidia 15.49 WHQL for Windows Vista and Windows 7
Download
For X64 (64-bit windows 7) : Download
For the unknown device normally it refer to the Quicklaunch button, download here:
ftp://ftp.hp.com/pub/softpaq/sp45001-45500/sp45058.exe
If you still have problems, leave your comments
Friday, September 9, 2011
ERROR CODE 43 General Solutions
ERROR CODE 43: Microsoft describe that this error happen because "One of the drivers controlling the device notified the operating system that the device failed in some manner. "
There are several way to solve this problem, and from my opinion this happen basically cause by the SOFTWARE or the HARDWARE. There is no specific reason why this happen, a mystery that cause us a headache to figure what cause this error.
THE CAUSE:
Theoretically, from the solution we may guess what the causes, such as dusty hardware, electrical overcharge on the component, faulty hardware or corrupted Windows file. This may happen on both the external or Internal hardware which is based on USB type hardware, such as Pendrive (USB storage), Card reader, USB Mouse and Keyboard, Webcam etc and it can happen on all windows operating system.
IMPORTANT!
-this post for those who getting the ERROR CODE 43 Only!.
SOLUTION:
This solution is a compilation from my reading and experience, if you have a another solution, share it here, it will help others too.
1. CHECK THE DEVICE AND USB PORT.
- try to plug the USB in your friend computer, if does't work, try on another friend computer, if still doesn't work, get a new one.
- If there are drivers released by your manufacture for the device, download and reinstall it.
- Make sure you also try on other USB port available on your PC.
this step is to make sure the hardware is not faulty.
2. RESET.
a) Reset the CMOS - (please make sure you know how to open your laptop or assisted by the manual or experienced friend) , take out the CMOS for 15 minutes (unplug power chord and battery) and put it back.
b) Power Reset - base on Darwin's step brother theory that they might be electrical overcharge on the Computer component including the USB port. Unplug the battery and Power chord. make sure there are no any electrical source connected with your computer. wait for 15 minute to plug it back and turn on your pc.
3. RESTORE
If yesterday or last week the USB port/Device work like charm, and today it does not work anymore. Perform system restore. If you need a guide on that, refer to my tutorial here.
4. CLEAN YOUR PC.
Take out the RAM, HDD, WIFI CARD and CMOS. Clean it with DRY brush or blow some air to remove the dust. Make sure you also clean the USB port and Keyboard with the brush.
The solution above is the basic solution, below is the solution which i prefer the last step to take.
5. UNISTALL and REINSTALL THE DRIVER
open device manager, right click on the device with yellow and select unistall, the restart and update the driver (automatically)
6. BIOS
It kinda weird because there are users who manage to solve this by updating the BIOS. Download the latest BIOS from your manufacture site. Flash and turn on the PC. NOTE: FLASHING WRONG BIOS CAN DAMAGE YOUR PC, SO I STRONGLY RECOMMEND FOR NEW USER TO SKIP THIS METHOD.
7. REINSTALL OS
Well, this method maybe kinda lame but this is my favorite method which is reinstall windows with or without formatting.
SOME NOTES:
1. WINDOWS UPDATE : I don't know weather windows update can cause this, but if it happen after windows update, just uninstall it from the control panel (start - control panel - uninstall program/add remove program). On the other hand, you can also search fixes from Microsoft by run automatic updates, select custom and search for human interface devices. Install it.
2. VIRUS: there are no reports which this error cause by the virus/spam etc. Unless the virus already conquered your OS for centuries, then no need think for the solution, just format and reinstall windows.
3. MICROSOT FIX: Still no details from microsoft, they just tell you to refer to the manufacture documentation.
Your feedback and suggestion are most welcome.
Thursday, September 1, 2011
Install Windows XP on HP Pavilion G4
To install windows XP in this model you need to perform slipstream process.
For those who not familiar with slipstream process, it is a process where we modify the original Windows XP installation file into a new Windows XP Installation file which contain a file (SATA DRIVER) which needed to perform the XP installation.
We need to integrate the sata driver because the laptop will not detect any HDD without it.
So to perform the slipstream process you can refer to my tutorial here:
http://getlaptopdriver.blogspot.com/2009/10/slipstreaming-guide-to-install-windows.html
Monday, August 29, 2011
Acer Crystal Eye Webcam For Windows 7
I write this post to give some information and drivers for ACER user who migrating or use windows 7, but cannot use or install webcam. So beside my recommendation, any feedback would be greatly appreciated.
So my idea is this:
- There are no official windows 7 driver for some ACER laptop model. So base on my experience one driver can be use with other model. Example we have webcam driver for Acer Aspire 4740G and it also work with Acer Aspire 4745.
Notice that sometime ACER provide more then 2 driver software for webcam. Suyin and Chicony is the most famous. Base on my experience with Acer aspire 4520 and 4530, both driver worked.
So try it and report the feedback here:
Acer webcam For windows 7 :
Recommended:
Acer_Camera_Suyin_v.5.2.5.3_Win7x86x64
Download (mediafire)
Download (4shared)
Download (ziddu)
reported work on:
Acer Aspire 5570Z Acer Travelmate 6292
Acer Aspire 4925G Acer Aspire4715z
Acer Aspire 7720G Acer Aspire 4715z
Acer Aspire 4920
Acer Aspire 2920
Acer Aspire 5738ZG
Acer Aspire One 532h
Acer Aspire 6530
Acer Aspire 5738ZG
Acer Travelmate 6291
Acer Aspire 5536G
Acer Aspire 5720
Acer Aspire One AOA110/150
Acer Aspire 4730z
Acer Aspire 4520
Acer Aspire 5630
Acer Aspire 5520G
Acer Aspire 4715Z
Ok maybe there are 2 person have the same model but one work and the other not. I strongly recommend before the installation, right click on the setup file and select run as admin.
After the installation finish also run the webcam application as admin.
OTHER VERSION:
For 4520:
Camera_Bison_UVC_Vista SP1.zip
Download
Acer Crystal Eye webcam 7.96.701
Orinially vista reported work in 7 using compatibility mode install.
still working on the link =)
USING VISTA DRIVER:
Another way is to install using your VISTA driver.
What i always did for people or person from tech support who asking for my help, (personally visited me) is by using the original vista driver. Go to acer support site, download the vista driver and install using compatibility mode.
COMPATIBILITY INSTALLATION:
1. Download the vista driver.
2. Extract and right click on setup file and select PROPERTIES.
3. Select Compatibility tab.
4. Select "run this program in compatibility mode for"
5. select windows vista. APPLY and CLOSE
6. Right click again on the drivers and select run as admin.
7 After the installation finish (if successful) right click on the shortcut and select run as admin.
8. If failed, right click on the shortcut - properties and compatibility - set to windows vista.
If you cannot find your vista drivers ,
leave your comment with your model, ill try to assist as much as i can, you can also try your xp driver (i never test webcam yet but for wireless i found some of them work just fine)
Sometimes, we have a hard time with this kind of problem and this also happened to me, even with all the experience i have (5 years), sometime i have to spent weeks for test with many version of the drivers. There are a case where no success for 2 week and i just reinstall the GRAPHIC/VGA driver (i uninstall it to teach someone to install graphic driver). After that the webcam driver installation success... feel bad is it? u just need to reinstall the graphic so that u can install the webcam.
give your feedback in comment section below, it could help others too.
Saturday, July 30, 2011
Can't find requested string - Solution
This post is a reply to the following comments:
Anonymous said... please help me.....the graphic driver installled but did not work....says can not find requested strings.....windows 7 compaq nc6220.....please update me on what to do
CONTENT:
A : INTRO :
B : CASE 1: General solution for "Can't find requested string" INTEL graphic.
C : CASE 2 : "Can't find requested string" happen after using windows Update.
D : CASE 3: "Can't find requested string" after installing newer driver's version.
A : INTRO:
Remember that LOG ON to your computer as ADMINISTRATOR. This is because i've been told that the first time a user logs on, the Intel software must attempt to establish what the locale of the system is, and then create an appropriate driver file in system32 for that language. The file to look for is IGFXRES.DLL
When a non administrator is logged in, the system does not create the DLL file. So to be more safe, to reinstall the driver log in as administrator and right click on the driver and select run as administrator.
-------------------------------------------------------------------------------------------------------
B : CASE 1: General solution for "Can't find requested string" INTEL graphic.
This problem commonly happen with computer that use INTEL GRAPHIC.
Intel said in thier website that this happen when:
So INTEL themself has done a great job to solve the problems and this is a repost from INTEL website, to read the original post by intel you can refer to this url:
SOLUTION:

Solution:
To work-around this issue, follow the steps listed below:
Note For Intel® 915G, 915GM/GMS, 910GL, 910GML, 945G, 945GM/GMS, and 940GML chipset-based products, this issue is resolved in graphics driver version PV14.24 and later. For the latest driver, run the Intel® Driver Update Utility.
Uninstall the Intel® Graphics driver using the following steps:
Open Windows* Control Panel by clicking Start » Settings » Control Panel or clicking Start » Control Panel.
Double-click Add/Remove Programs.
Select and remove the Intel® Extreme Graphics driver or Intel® Graphics Media Accelerator driver.
Follow the prompts to reboot the computer.
After reboot, Windows detects a new device (the graphics controller) and searches for the driver. Select Cancel in the Found New Hardware Wizard windows. The driver is installed in a later step.
Change the Windows* Regional and Language Options settings by following these steps:
Open Windows Control Panel.
Double-click Regional and Language Options

Figure 3 - Regional and Language Options
On the Regional Options tab, and note the currently selected language.
Change the language as follows:
If English (United Kingdom) is currently selected, choose a different English language listed.
If French (Canada) is currently selected, choose a different French language listed.
If Arabic (Lebanon) is currently selected, choose a different Arabic language listed.
Click Advanced and note the currently selected language.
Change the language as follows:
If English (United Kingdom) is currently selected, choose a different English language listed.
If French (Canada) is currently selected, choose a different French language listed.
If Arabic (Lebanon) is currently selected, choose a different Arabic language listed.
Click OK to accept these changes.
Click Yes when prompted to skip file copying and use existing files.
Click Yes to restart the computer.
After reboot, install the latest Intel® graphics driver using the Intel® Driver Utility Graphics tool.
After reboot, change the Regional and Language Options back to the original language settings noted in Steps 2c and 2e.
This applies to:
Intel® 82852/82855 Graphics Controller Family
Intel® 82865G Graphics and Memory Controller Hub (GMCH)
Intel® 82915G/82910GL Express Chipset Family
Intel® 82945G Express Chipset
Mobile Intel® 915GM/GMS, 910GML Express Chipset Family
Mobile Intel® 945GM Express Chipset Family
So Compaq NC6220 use Intel 915GM Graphics and this step may solve the problem.
---------------------------------------------------------------------------------
C : CASE 2 : "Can't find requested string" happen after using windows Update.
Normally when we installed updates and after that i cause problems, we just need to remove the updates in control panel.
-start - all program - control panel - add/remove program(xp)/uninstall programs(win 7)
-select show updates/view installed updates and remove the necessary updates. (the updates which after installed, it cause the error)
-after that reboot, and if the error still there, try to reintsall the driver and reboot (remember to log again as admin)
-------------------------------------------------------------------------------
D : CASE 3: "Can't find requested string" after installing newer driver's version.
There are to way to solve this.
First is my favourite is by using SYSTEM RESTORE. To do this:
I - win XP
a) click start - all programs - accessories - system tools -system restore
b) Select "restore my computer ...." and select the date before the error happen.
c) wait it finish and it will reboot if it goes well your problems solved.
II - Win 7
a) Click start and on the search box type SYSTEM RESTORE - select the top result.
b) it will take few secs for system restore to open. Select next and select SHOW MORE REStORE POINT.
c) Select the date before you install the new graphic and wait till it finish. it will reboot if it goes well your problems will be solved.
UNISTALL and REINSTALL DRIVER
1. Unistall current driver - reboot - install original/ older version of the driver.
I -to uninstall the current graphic driver you can go to control panel and remove it,
II- you can also go to device manager (win xp - click star and select run -type DEVMGMT.MSC and press enter) (win 7 - click start and on search box type DEVICE MANAGER and select the top result).
expand the display adapter - on the graphic select UNISTALL - reboot
I strongly recommend use device manager to unistall the driver unless it does not appear in device manager so use method II.
Then reinstall the original/older version of the graphic driver.
-----------------------------------------------------------
Well the be honest this problems never happen to me but i suggest the solution base on my experience. For those who try this method and have something to share, please post it in the comments section below and i hope this post can start a good discussion regarding the problems.
Anonymous said... please help me.....the graphic driver installled but did not work....says can not find requested strings.....windows 7 compaq nc6220.....please update me on what to do
CONTENT:
A : INTRO :
B : CASE 1: General solution for "Can't find requested string" INTEL graphic.
C : CASE 2 : "Can't find requested string" happen after using windows Update.
D : CASE 3: "Can't find requested string" after installing newer driver's version.
A : INTRO:
Remember that LOG ON to your computer as ADMINISTRATOR. This is because i've been told that the first time a user logs on, the Intel software must attempt to establish what the locale of the system is, and then create an appropriate driver file in system32 for that language. The file to look for is IGFXRES.DLL
When a non administrator is logged in, the system does not create the DLL file. So to be more safe, to reinstall the driver log in as administrator and right click on the driver and select run as administrator.
-------------------------------------------------------------------------------------------------------
B : CASE 1: General solution for "Can't find requested string" INTEL graphic.
This problem commonly happen with computer that use INTEL GRAPHIC.
Intel said in thier website that this happen when:
- This message can be seen when installing a newer version of the Intel® graphics driver (PV14.13 or later).
- This error displays in the Intel graphics driver system tray menu (see Figure 1) and the Windows* Control Panel icon.
So INTEL themself has done a great job to solve the problems and this is a repost from INTEL website, to read the original post by intel you can refer to this url:
http://www.intel.com/support/graphics/sb/CS-021334.htm
SOLUTION:

Error displayed in Intel® Graphics driver Control Panel icon
Solution:
To work-around this issue, follow the steps listed below:
Note For Intel® 915G, 915GM/GMS, 910GL, 910GML, 945G, 945GM/GMS, and 940GML chipset-based products, this issue is resolved in graphics driver version PV14.24 and later. For the latest driver, run the Intel® Driver Update Utility.
Uninstall the Intel® Graphics driver using the following steps:
Open Windows* Control Panel by clicking Start » Settings » Control Panel or clicking Start » Control Panel.
Double-click Add/Remove Programs.
Select and remove the Intel® Extreme Graphics driver or Intel® Graphics Media Accelerator driver.
Follow the prompts to reboot the computer.
After reboot, Windows detects a new device (the graphics controller) and searches for the driver. Select Cancel in the Found New Hardware Wizard windows. The driver is installed in a later step.
Change the Windows* Regional and Language Options settings by following these steps:
Open Windows Control Panel.
Double-click Regional and Language Options

Figure 3 - Regional and Language Options
On the Regional Options tab, and note the currently selected language.
Change the language as follows:
If English (United Kingdom) is currently selected, choose a different English language listed.
If French (Canada) is currently selected, choose a different French language listed.
If Arabic (Lebanon) is currently selected, choose a different Arabic language listed.
Click Advanced and note the currently selected language.
Change the language as follows:
If English (United Kingdom) is currently selected, choose a different English language listed.
If French (Canada) is currently selected, choose a different French language listed.
If Arabic (Lebanon) is currently selected, choose a different Arabic language listed.
Click OK to accept these changes.
Click Yes when prompted to skip file copying and use existing files.
Click Yes to restart the computer.
After reboot, install the latest Intel® graphics driver using the Intel® Driver Utility Graphics tool.
After reboot, change the Regional and Language Options back to the original language settings noted in Steps 2c and 2e.
This applies to:
Intel® 82852/82855 Graphics Controller Family
Intel® 82865G Graphics and Memory Controller Hub (GMCH)
Intel® 82915G/82910GL Express Chipset Family
Intel® 82945G Express Chipset
Mobile Intel® 915GM/GMS, 910GML Express Chipset Family
Mobile Intel® 945GM Express Chipset Family
So Compaq NC6220 use Intel 915GM Graphics and this step may solve the problem.
---------------------------------------------------------------------------------
C : CASE 2 : "Can't find requested string" happen after using windows Update.
Normally when we installed updates and after that i cause problems, we just need to remove the updates in control panel.
-start - all program - control panel - add/remove program(xp)/uninstall programs(win 7)
-select show updates/view installed updates and remove the necessary updates. (the updates which after installed, it cause the error)
-after that reboot, and if the error still there, try to reintsall the driver and reboot (remember to log again as admin)
-------------------------------------------------------------------------------
D : CASE 3: "Can't find requested string" after installing newer driver's version.
There are to way to solve this.
First is my favourite is by using SYSTEM RESTORE. To do this:
I - win XP
a) click start - all programs - accessories - system tools -system restore
b) Select "restore my computer ...." and select the date before the error happen.
c) wait it finish and it will reboot if it goes well your problems solved.
II - Win 7
a) Click start and on the search box type SYSTEM RESTORE - select the top result.
b) it will take few secs for system restore to open. Select next and select SHOW MORE REStORE POINT.
c) Select the date before you install the new graphic and wait till it finish. it will reboot if it goes well your problems will be solved.
UNISTALL and REINSTALL DRIVER
1. Unistall current driver - reboot - install original/ older version of the driver.
I -to uninstall the current graphic driver you can go to control panel and remove it,
II- you can also go to device manager (win xp - click star and select run -type DEVMGMT.MSC and press enter) (win 7 - click start and on search box type DEVICE MANAGER and select the top result).
expand the display adapter - on the graphic select UNISTALL - reboot
I strongly recommend use device manager to unistall the driver unless it does not appear in device manager so use method II.
Then reinstall the original/older version of the graphic driver.
-----------------------------------------------------------
Well the be honest this problems never happen to me but i suggest the solution base on my experience. For those who try this method and have something to share, please post it in the comments section below and i hope this post can start a good discussion regarding the problems.
Thursday, February 3, 2011
Install Ubuntu Inside Windows (WUBI)
In this tutorial I will show how to Install Ububtu inside windows (dual boot windows and ubuntu)
===========================
CONTENTS:
===========================
I. Downloading ISO and WUBI file
II. Selecting Partition
III. Installing Ubuntu
IV. Some Notes
==========================
I. Downloading ISO and WUBI file
1. Ubuntu ISO file : Download here
(select the latest version from drop down menu and select 32-bit if you are new to ubuntu)
(note that the latest is 10.10 and over time there will be other release)


2. WUBI Installer: Download here


Save both file and wait until. download finish.
II. Selecting Partition
1. You can use any partition you want because it will not clean up your data on the selected partition.
2. You can easily remove ubuntu installation via add/remove program from control panel.
3. Make sure you partition have at least 17GB free. (minimum space is 15GB)
III. Installing Ubuntu
1. Here i select one of my partition - D partition, and i rename it with ubuntu.

2. After finish download both file, palce them in D drive (or any partition you want to install ubuntu)

3. Double click on WUBI and you will see this screen.
 by default, it will select C partition as installation drive, so you have to change to drive you want to install.
4. change the following:


===========================
CONTENTS:
===========================
I. Downloading ISO and WUBI file
II. Selecting Partition
III. Installing Ubuntu
IV. Some Notes
==========================
I. Downloading ISO and WUBI file
1. Ubuntu ISO file : Download here
(select the latest version from drop down menu and select 32-bit if you are new to ubuntu)
(note that the latest is 10.10 and over time there will be other release)
click on the picture to enlarge


2. WUBI Installer: Download here


Save both file and wait until. download finish.
II. Selecting Partition
1. You can use any partition you want because it will not clean up your data on the selected partition.
2. You can easily remove ubuntu installation via add/remove program from control panel.
3. Make sure you partition have at least 17GB free. (minimum space is 15GB)
III. Installing Ubuntu
1. Here i select one of my partition - D partition, and i rename it with ubuntu.

2. After finish download both file, palce them in D drive (or any partition you want to install ubuntu)

3. Double click on WUBI and you will see this screen.

4. change the following:

1- Installation drive : change it to the partition you want to install ubuntu.
2 - select the size of your ubuntu installation, minimum 15GB (make sure after installation the space not less then 2GB.
3 -Insert password, it a must to continue installation.
---click Install---
5. After clicking install it will begin to install:

6. When it finish, you will be prompt to restart, restart your computer to continue installation.

7. After restart, on the boot selection select ubuntu.

8. After that, a screen will appear with a countdown 5, 4.... and at this part, you do not need to do anything, just wait it install untill it reboot. After reboot your ubuntu installation is complete.
IV. Some notes
1. So after finish installing, every time you turn on your computer you will see the OS selection, to use ubuntu simply select ubuntu.
2. You can remove ubuntu installation from control panel -add/remove program.
3. After log in to your ubuntu - run updates first.
------------------------------------------------------------------------------------------------
P/s: nothing important here, just if you want to read something (^^)
Ubuntu provide wubi to install ubuntu, i try wubi and it took me like forever to install it. I notice that wubi will first downloading the ISO file for installation (about 1-2 hour to wait). So, my idea is to download the ISO and place it with the wubi, so it will not download the ISO but instead use the ISO i downloaded earlier and it WORKS. I also notice that downloading ISO separately are faster the WUBI downloading it.
--------------------------------------------------------------------------------------------------
Saturday, January 15, 2011
Check Your Driver In Windows 7
Anonymous said...
I am using Compaq Presario CQ41-110AU and Windows 7, but I have no idea whether any drivers already installed or not :(
because I asked my friend to re-install my laptop.
How to find out what drivers have not been installed yet? and I also need MS Office for Win 7, how to install it?
Thank you in advance.
This guide will show you how to check your computer device driver so that you can identify which driver you need to install. This guide apply for windows XP, Vista and 7.
1. First we use device manager to check our devices. To open device manager click start and on the search box type DEVMGMT.MSC

2. Then a device manager will open. There you will see list of devices of your computer.
a) A computer with all the drivers installed will show no yellow mark in the device manager

b) while the computer with incomplete driver will show yellow mark. But for your graphic (Display), it will show Video controller with yellow mark or under the display adapters it will show Standard VGA Graphic adapters.

3. So now you can identify weather your computer driver is missing driver or not. So the problems is how to get the right Driver.
a) If you know yor computer model say Lenovo Ideapad s10, so just type "Lenovo Support" on google and enter the support site. So browse for your driver there.
b) If it appear that you didn't know what is your model. You can get the hardware ID for the devices and search the hardware ID on google.
c) Lastly, You can request your driver here in Request section.
Friday, December 31, 2010
Compaq Presario CQ36 ATI Graphic Driver Windows XP
This guide will show you how to install the graphic Driver for CQ36 models which using ATI graphic Chipset:
1. First Download these 3 files:
Download 1
Download 2
Download 3
2. Create a folder at your desktop name it as ATI GRAPHIC.

3. Place all 3 files you downloaded in the folder.

3.Right click the first file (ati_8.672xp.part1.rar) you downloaded and select extract files, you need winrar software to do this.

4. After extract you will get the driver files folder name ati_8.672xp, open the folder and again you will see the same folder, open the folder too.

5. Open the folder and double click on the ""

6. Follow on screen istruction until it finish.
7. Restart after installation finished.
FAQ:
1. Where can i get the Winrar foftware.
Its all over the web, you can search it using Google. It is a freeware.
2. Why there are error message " corrupted archieve file, break operation..bla bla"
That mean the file you downloaded incomplete while windows said the download finish, make sure the overall size is 106MB
3. My CQ36 use intel graphic, where i can download it?
refer here : use the gaphic from there
1. First Download these 3 files:
Download 1
Download 2
Download 3
2. Create a folder at your desktop name it as ATI GRAPHIC.
3. Place all 3 files you downloaded in the folder.

3.Right click the first file (ati_8.672xp.part1.rar) you downloaded and select extract files, you need winrar software to do this.

4. After extract you will get the driver files folder name ati_8.672xp, open the folder and again you will see the same folder, open the folder too.

5. Open the folder and double click on the ""

6. Follow on screen istruction until it finish.
7. Restart after installation finished.
FAQ:
1. Where can i get the Winrar foftware.
Its all over the web, you can search it using Google. It is a freeware.
2. Why there are error message " corrupted archieve file, break operation..bla bla"
That mean the file you downloaded incomplete while windows said the download finish, make sure the overall size is 106MB
3. My CQ36 use intel graphic, where i can download it?
refer here : use the gaphic from there
Saturday, December 18, 2010
Set Speaker As Default
This tutorial will show you how to set you speaker as the default audio.
(click the picture to enlarge)
1. First click start and select control panel.

2. Click on Hardwar and sound

3. Click on Sound

4. Then select the Speakers - click on set as default - then press ok.

This tutorial created base on Compaq Presario F700 audio problems in Windows 7, and you may also apply for any model. If you have something to ask leave your comments.
Thursday, November 25, 2010
Find Model Name, Product Code, Serial Number and Service Tag for SONY
Notebook computer model names begin with the letters "PCG", "VGN" or "VPC" and are located on a small label on the frame around the LCD display or above the keyboard. The label is normally the same color as the case with contrasting letters.


Combination Label:
Some models may have all model information combined on one white barcode label located on the bottom of the computer. The label may be located anywhere on the bottom of the computer so it may be necessary to look carefully to locate it.
Separate Product Code / Serial Number and Service Tag Labels:
 On other models, the Product Code and Serial Number are located on a small white barcode label and the Service Tag (only on some models) is located on a second label on the bottom of the computer or behind the battery. The labels may be located anywhere on the bottom of the computer so it may be necessary to look carefully to locate them.
NOTE: Do not use the "Model" listed on the grey label on the back of the computer as this will not provide the correct information.
Combination Label:
Some models may have all model information combined on one white barcode label located on the bottom of the computer. The label may be located anywhere on the bottom of the computer so it may be necessary to look carefully to locate it.
Separate Product Code / Serial Number and Service Tag Labels:
On other models, the Product Code and Serial Number are located on a small white barcode label and the Service Tag (only on some models) is located on a second label on the bottom of the computer or behind the battery. The labels may be located anywhere on the bottom of the computer so it may be necessary to look carefully to locate them.
Monday, October 25, 2010
Headphone Problem in V3000 (SOLVED)
If you have compaq presario V3000 and installed XP on it, but when you plug in the headphone, both speaker and headphone produce sound, to solve this simply download this audio driver below and install it.
size: 921KB
Download
If, it refuse to install, uninstall current driver, restart and install this driver.
size: 921KB
Download
If, it refuse to install, uninstall current driver, restart and install this driver.
Wednesday, August 18, 2010
No sound from Headphone
Normally this happen to old laptop model with Windows 7 as OS, follow the steps below:
1. Go to Control Pannel, start - control panel
2. Then click on Hardware and Sound
3. After that click on Sound
4. Then you devices should come up, speakers, Digital Audio, and headphones
5. plug your headphones in
6. then select headphones
7. at the bottom it will say set as default
8. Select that and you are done
Wednesday, January 6, 2010
How to enable microphone after install windows XP
Some laptop model or PC will not detect the microphone after install windows XP because by default the MIC volume is mute. If you can listen to music using your PC and Laptop that mean basically your mic will work.
FIRST STEP:
Enable your microphone volume
1. Right click on your volume icon and select Open Volume Control.

2. Then click on OPTION.

3. Select PROPERTIES.

4. On the list, make sure the MICROPHONE box is Check, if not, click to check it.

5. Then press OK. After that you will back to the VOLUME CONTROL again. Here you will see the microphone panel appear.

So if the MUTE BOX under Microphone Panel check, uncheck it, and it will look like this:

6. Increase The mic volume as you like and you're done.
Tuesday, November 24, 2009
Installing Windows 7: Part 1
SETTING BIOS - PART 1 - PART 2
Ok, if you finish read part one i consider you already set the BIOS order to boot from CD/DVD. Here in part one it will cover boot from CD and customizing hard disk and partition for Windows 7 installation.
Installing Windows 7: Part 1
1. make sure the Windows 7 DVD already in your DVD Drives.
2. Start you PC/Notebook and wait until it prompt "PRES ANY KEY TO BOOT FROM CD/DVD..." (figure 2), now press any key (it will only wait about 5-6 second, if you have new laptop that have no operating system it will automatically boot from DVD).


5. After click next you will see the screen below (figure 4). Select Install Now

6. Then select agree by checking the box. click next.

7. When you arrive here (figure 6), you can select upgrade or costum:
UPGRADE: recomend to those who already have VISTA installed.
COSTUM : For other version such XP, 98, 2000, Me
here for both vista and XP i suggest custom for fresh installation


Ok, if you finish read part one i consider you already set the BIOS order to boot from CD/DVD. Here in part one it will cover boot from CD and customizing hard disk and partition for Windows 7 installation.
Installing Windows 7: Part 1
1. make sure the Windows 7 DVD already in your DVD Drives.
2. Start you PC/Notebook and wait until it prompt "PRES ANY KEY TO BOOT FROM CD/DVD..." (figure 2), now press any key (it will only wait about 5-6 second, if you have new laptop that have no operating system it will automatically boot from DVD).

(figure 2:images from: http://www.microsoft.com/)
3.Then this screen will appear.

just wait untill it finish loading files.
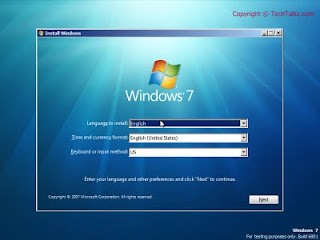
4. After that the screen (figure 3) will appear. Here just click next ( i recommend new user just left the setting default)

figure 3
5. After click next you will see the screen below (figure 4). Select Install Now

figure 4

figure 5
7. When you arrive here (figure 6), you can select upgrade or costum:
UPGRADE: recomend to those who already have VISTA installed.
COSTUM : For other version such XP, 98, 2000, Me
here for both vista and XP i suggest custom for fresh installation

figure 6
8. After select custom installation select the partition you wish to install (select C drive recommended) and hit next and skip no 9 and 10.
If you have new HDD select advance driver option.

figure 7
9. For creating new partition only! select new.

figure 8
10. Choose the capacity for your new C drive then apply. (figure 9)
(below recommended for end user, advance user=u know which better rite)
40GB: set to 20GB for c(20000MB)
80GB: set to 30GB for c
160GB: set to 60GB for c(20000MB)
250GB: set to 60-80GB for c(20000MB)
others (for c normally min 50 and max 100)

figure 9
11. Then click next, now just wait and let it finish the installation.

figure 10

figure 11
at this point your PC/Notebook will restart, and you have to do nothing here.
continue part 2
credits:
http://www.techtalkz.com/windows-7/514412-windows-7-installation-guide-tutorial.html
pictures: Strider
edite by: Black x
Installing Windows 7: Part 1
SETTING BIOS - PART 1 - PART 2
Ok, if you finish read part one i consider you already set the BIOS order to boot from CD/DVD. Here in part one it will cover boot from CD and customizing hard disk and partition for Windows 7 installation.
Installing Windows 7: Part 1
1. make sure the Windows 7 DVD already in your DVD Drives.
2. Start you PC/Notebook and wait until it prompt "PRES ANY KEY TO BOOT FROM CD/DVD..." (figure 2), now press any key (it will only wait about 5-6 second, if you have new laptop that have no operating system it will automatically boot from DVD).
5. After click next you will see the screen below (figure 4). Select Install Now
6. Then select agree by checking the box. click next.
7. When you arrive here (figure 6), you can select upgrade or costum:
UPGRADE: recomend to those who already have VISTA installed.
COSTUM : For other version such XP, 98, 2000, Me
here for both vista and XP i suggest custom for fresh installation
Ok, if you finish read part one i consider you already set the BIOS order to boot from CD/DVD. Here in part one it will cover boot from CD and customizing hard disk and partition for Windows 7 installation.
Installing Windows 7: Part 1
1. make sure the Windows 7 DVD already in your DVD Drives.
2. Start you PC/Notebook and wait until it prompt "PRES ANY KEY TO BOOT FROM CD/DVD..." (figure 2), now press any key (it will only wait about 5-6 second, if you have new laptop that have no operating system it will automatically boot from DVD).
(figure 2:images from: http://www.microsoft.com/)
3.Then this screen will appear.
just wait untill it finish loading files.
4. After that the screen (figure 3) will appear. Here just click next ( i recommend new user just left the setting default)
figure 3
5. After click next you will see the screen below (figure 4). Select Install Now
figure 4
figure 5
7. When you arrive here (figure 6), you can select upgrade or costum:
UPGRADE: recomend to those who already have VISTA installed.
COSTUM : For other version such XP, 98, 2000, Me
here for both vista and XP i suggest custom for fresh installation
figure 6
8. After select custom installation select the partition you wish to install (select C drive recommended) and hit next and skip no 9 and 10.
If you have new HDD select advance driver option.
figure 7
9. For creating new partition only! select new.
figure 8
10. Choose the capacity for your new C drive then apply. (figure 9)
(below recommended for end user, advance user=u know which better rite)
40GB: set to 20GB for c(20000MB)
80GB: set to 30GB for c
160GB: set to 60GB for c(20000MB)
250GB: set to 60-80GB for c(20000MB)
others (for c normally min 50 and max 100)
figure 9
11. Then click next, now just wait and let it finish the installation.
figure 10
figure 11
at this point your PC/Notebook will restart, and you have to do nothing here.
continue part 2
credits:
http://www.techtalkz.com/windows-7/514412-windows-7-installation-guide-tutorial.html
pictures: Strider
edite by: Black x
Subscribe to:
Posts (Atom)